Why is my computer running slow? My computer is running slow what should I do? Are the questions asked time and time again by many people?
The reason for slowing down of your computer is a small one, Windows PC’s typically slow down as application are installed and used. This is really very frustrating and makes your blood boil.
So here we came up with the 9 habits that help you to stop your PC to run slow.
1. Keep Temporary Files Temporary
This is one of the habits that stop your PC to run slow. Windows caches are widespread and mysterious, the local temporary cache controls over all the largest nuisance and this cache stores files downloaded through the web browser when loading websites. And this increase makes the PC run slow.
You can delete your Windows temporary cache by making use of the Disk Cleanup. For this: go to Start and type Disk Cleanup.
For Windows XP user, access this program under Start > Accessories > System Tools > Disk Cleanup.
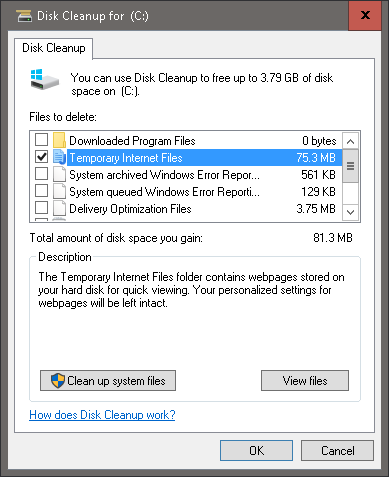
Disk Cleanup will analyze the storage of system drive (named C: / drive by default) and prompt you to delete some files. Click on the Temporary Internet Files selection and the Disk Cleanup tool will delete temp files automatically. You can also remove these files manually. For this go to Start and type %temp%. Windows XP users can found the same file by pressing Windows key + R to launch the Run menu, and then type %temp% and hit Enter.
2. Fragmentation Is Not Your Friend
This advice is applied to hard drives only and is chiefly helpful to the people who save, edit and store different types into their PC often. Generally, Windows machine does not simply write over original file during saving a document for ex. Word or Excel document. Instead that the file is saved onto a different part of the drive and after complete use these amount of information become spread or scrappy and this gradually slow down PC to open files rapidly
Disk Defragmenter programs (in Windows 10 as the Defragment and Optimize Drives application) become important. This is the simplest option that is presented on Windows computer. You can also go for third party defragmenters to sort the hard drive.
To access the tool first go to Start and type Disk Defragmenter. In Windows XP go to Start > Programs > Accessories > System Tools > Disk Defragmenter
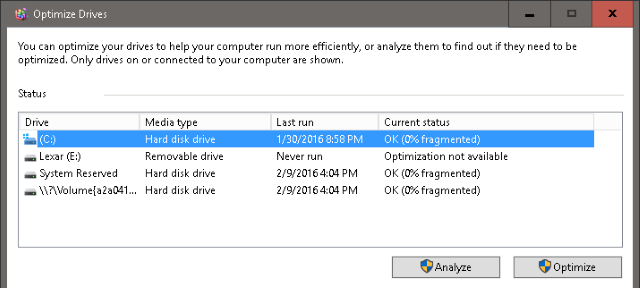
The window will display disk drives located on your PC and will automatically choose the main drive present (named C: / by default). You can examine the drive which will display the percentage of fragmentation present on the hard drive.
Well, defragmenting a hard drive is resource and time intensive, so it is recommended to begin the process when PC is in the fairly low state of use. The process totally depends on the size of your hard drive and might take up to an hour, after completing restart your computer. Apply this monthly and you will find a noticeable difference in speed while opening and accessing files, along with gaming and editing applications.
Note: If you are having a solid state drive (SSD), then Disk Defragmenter will do more harm than good. So it is good to verify whether you are using an SSD or an HDD is through Windows 10’s Optimize Drives application that lists disk type under the Media type menu.
For other Windows versions, you can find this information under Start > Program > Accessories > System Tools > System Information > + Components > + Storage > Disks

Also do not mistake Standard Disk Drive for a Solid State Drive; if your drive is listed as a Disk drive, this means you are using an HDD. If so, disk defragments away.
3. Ensure No Unnecessary Program is Running
This is also very important and this can’t be ignored. You need to check what services are being run on your PC. For this: Press together Windows key + R button and go to Run > type msconfig and press Enter
Then in the Window go to the services tab and check mark the Hide all Microsoft Services, and turn of any service that is not required, after that reboot your computer.
To see what programs are running press ctrl+alt+delete to open task manager. And go to the programs tab.
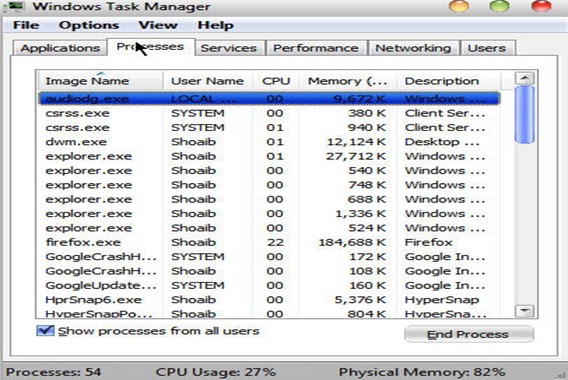
Note: Before ending up any of the programs from being used by your system it is recommended to first search a little bit in Google, why the program running and what is it needed for.
4. Adjust Your GUI
This is the easiest and most creative method to speed up your computer adjusts your GUI (Graphical user Interface) for best performance.
To access these settings in Windows XP, go to Start then right-click My Computer, select Properties > Advanced Tab > Performance.
In Windows 10 open the File Explorer, right click This PC and go to Properties > Advanced System Settings > Advanced Tab > Performance > OK.

Out of the three radio buttons, choose the button labeled Best Performance > OK. By default, the Visual Effects option in Windows is set to Best Appearance, so that the newly operating system has the bright, fresh out the box look. Unluckily, it does so at the cost of computer’s performance.
You can set up a virtual Windows image. This is simple, one time only and a sure way to minimize background processing on your PC.
5. Change Your Startup
The recently downloaded software can slide its way into the startup programs and considerably reduce the wake time of Windows computer. And under the Startup, you can find a list of services that instigate when the first time you turn on your device. Some of these programs are necessary for computer functions while others are unnecessary services that slow down the PC’s wake time.
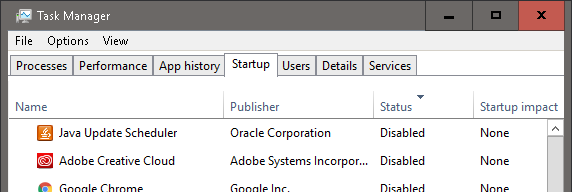
To open the startup list in Windows 10, right-click the Taskbar, and choose Task Manager, and switch to the Startup tab.
In Windows XP hit Windows key + R to launch the Run menu, and type msconfig, and click OK. This command will open the System Configuration Tools panel. Then click on the Startup tab and you can configure your startup as you desire.
Since regulating startup programs is a careful process, check the startup list once a month can mean the difference between seconds or minutes of waiting for your computer to boot.
6. Defend Your Windows with Windows Defender
Windows Defender is the most trusted option; this is simple, low processing usage and constantly updated virus listing, Windows Defender is the best for the users that want an effective and no fill anti-virus software.
If you are using Windows 8, Windows RT, Windows 8.1, Windows RT 8.1, and Windows 10, Windows Defender is already installed onto the PC. For older Windows versions user needs to download third-party antivirus software.

Install and run it, then choose between the Quick or Full Scan option to scan your PC. For full-time protection, click on the Settings tab and enable an option to keep Windows Defender running in the background. Once a month scan your PC and this will keep your Windows computer free of viruses and other malware
7. Keep Your Antivirus Program Updated
This is also very necessary to keep your antivirus program updated. A slow computer can be the result of unwanted programs as this makes the PC sluggish and this also takes up the system resources and can seriously slow down your system.

So try to keep operating systems updated and patched with the latest security measures will help keep a computer safe from the latest threats.
8. Be Aware While Installing Anything in Your PC
This is also important to be aware of what you are installing. Just install the application that you actually require and you will generally prevent the dreaded format and reinstall.

Here are few tips to help you know what applications you should be careful with:
- Apps that function as an Explorer plug-in: These are very dangerous as they directly hook into the shell and will also make your entire PC slow or in the worst case, crash repeatedly.
- Antivirus applications: These are dishonorable for slowing down your PC, and you should never , ever use more than one real-time antivirus application at a time
- Anything ads that say it wills “Speed Up Your PC” or “Optimize Your RAM” will most likely slow it down, or damage the system, these are like the plague. So try to avoid all that as far as possible.
- Be sure to install official system drivers from the manufacturer website. Drivers play a very important role and have a huge impact on performance, so have stable, updated drivers.
- Registry cleaners are a mixed bag and are not going to speed up your PC in most cases. The biggest problem is that many of the commercial registry cleaners set themselves to run at startup in the system tray, and waste your memory and CPU cycles.
- Avoid opening unknown emails, downloading free software programs, videos files, games and many others.
9. Keep Big Files Off the Desktop
Saving all the files and programs on the desktop is easy but this really slows down the computer. The various files and programs saved on the desktop are represented by images and these images include the background image on the desktop and take up memory. So the more images saved on the desktop mean m ore images stored in the memory.

So if you have a lot of files put them in separate folders. Create shortcuts on your desktop for the folders or files you are using frequently. This will also reduce the time and frequency hard drive is used and improves the speed of the program you open. This is the simple and easy habit that makes avoid your PC from slowing down.
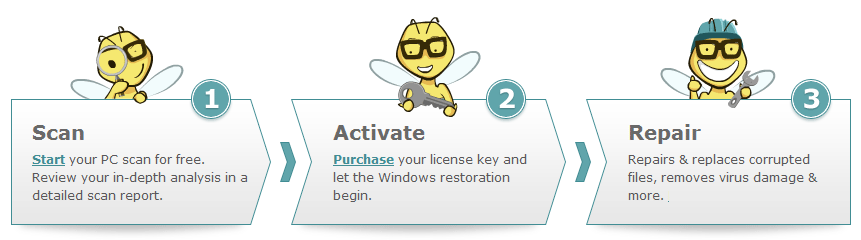
Scan your PC with the Professional Tool:
You can scan your PC with the PC Repair Tool, this is a repair utility that can help to fix the Windows operating system from damages caused by viruses, malware, spyware and many others. This helps to make the PC error free and fix the problem of crashes, freezes, blue screen errors and much more. It fixes the errors from the online database those data are required to resettle your OS and run it smoothly. It also optimizes the performance of the PC/laptop and enhances the speed of the PC, and application installed. It only fixes the errors but also keep an eye on how PC hardware are running and detect the hardware problem so that the user can get them repaired. It is an excellent tool to fix various errors in the Operating system. This can repair various errors like DLL error, Windows error, Application error, repair Registry utilities, PC error, Blue screen of Death errors, slow computer, and various other Windows error messages. It is easy to use and fixes the error automatically so there is no need to contact and technical person. Just download and install it to make your PC error free.
Features Of Windows Error Fixer Tool:
- Reimage repair software possesses an online database of more than 25 million definitions and other update components that are important in maintaining your PC.
- This tool has the latest repair mechanism and takes backup of the Windows system and working as a recovery system.
- This tool has the ability to uninstall the installed tools and recovers the missing passwords. It also increases the system booting time by defragmenting the system drivers.
- It deals with the stability and security issues
- This tool will also take care of system registry, CPU memory and hard drive of the computer system.
- It checks the hardware of the PC and increases the performance of the PC
- Provides the best online repairing solution for the Windows OS.
- This can detect multiple and latest problems of the PC
- It is time saving and the cheapest solution as compared to the technician