Tried installing the Anniversary update but you are unable to do so because there is not much space? If you have a computer with a large amount of available storage then you might not even notice this useless data. Or if you have countless high-resolution photos, tens of thousands of songs, hundreds of HD-quality movies and you can find yourself hitting your memory limit in no time. This sort of problem can be founded on older machines. Due to Microsoft’s aggressive update strategy and Windows 10’s low system requirement, there are lots of people who are using the operating system on their computers that actually do not have the same amount of space as compared to modern computers.
Well, whatever the reason may be, if you exceed the limit then it will become quite important to know how to free up space without deleting your personal media.
Scenario Faced by a User:
“Hey!! I am Albert.. do you have any methods to clean up or free up the system disk? I recently updated to Windows 10. Things were working quite fine but the only problem is that the system disk was taken up by quite a lot strange files. And the PC runs quite slower after I installed the new Windows 10 Anniversary Update. And now I am wondering how to find the best way to free up the system disk by just cleaning up all useless files but keep the important apps. If you have any suggestions, please let me know. Thank You!!!”
Well, after going through your problem I found that you actually need to fix this issue soon so that you can easily update the new Windows 10 Anniversary Update. Here, in the below section, you will get the tips to freeing up disk space on Windows 10:
Lost system disk problem actually cause number of issues for Windows users who are trying to install Windows 10 Anniversary Update or for those who have already updated to latest Windows 10 system. If you are facing any issues while installing or after installing Windows 10 anniversary update then don’t panic because you can now follow the below-offered methods to free up system disk for Windows 10 anniversary update with an ease.
Tricks to Clean up System Disk For Windows 10 Anniversary Update:
Trick 1: Clear the Update Cache:
Another way to remove storage space that is being unnecessarily hogged by Windows is to delete the update cache. The update cache is consists of the update installation files. The operating system uses them if user even forced to reapply the update. It saves downloading them again. However, it is a good idea but they take up a lot of space. The process to clear the update cache is mentioned below:
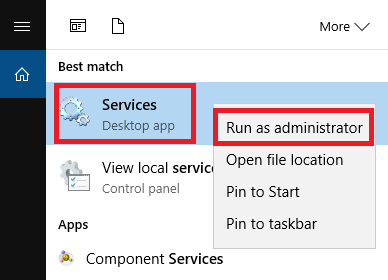
- In the first step, it is required tom stop the Windows Update service. And then search for services and right-click on the top result and then open it as an administrator.
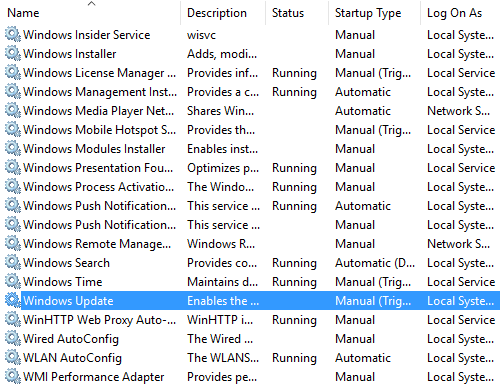
- After this, scroll down the list of entries until you find Windows Update and then right-click on it and choose Stop.
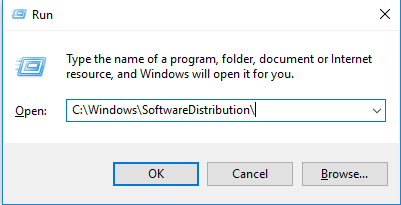
- You will now need to delete the files and then press Windows key + R in order to open the run box. Now type C:\Windows\SoftwareDistribution\ and hit Enter.
- After these, you can now delete everything within the Downloads folder.
- Last but not the least, you will need to head back to services and then re-enable Windows Update.
Trick 2: Uninstall Apps you Don’t Need to Free Up Space
- Press Windows + I and then click System -> App & Features.
- Identify applications you don’t need and select and then click Uninstall.
- Now confirm and click the second Uninstall button.
- If you are required to uninstall a Windows 10 Store app then no further action is required.
- If it is a legacy desktop application then follow the on-screen directions action is required.
- If it is legacy desktop applications then follow the on-screen directions to complete the uninstallation process.
Trick 3: Delete Unnecessary Files to Free Up Disk
In order to delete some unnecessary files to free up disk, you can follow the steps below:
- Press Windows + I -> Click on System -> Storage;
- Now select the drive you want to analyze and you can see Windows 10 categorizes the content based on default folders, games, apps and system files.
- If you wish to delete its content then click the view button to open them folder location and then simply delete the files you don’t need any more.
- Now go back to Storage usage and then click on Temporary files.
Now you will get a Windows 10 list of temporary files including Temporary files, Recycle Bin folder, Download folder and more. After this click on the button of the content you want to remove to follow the instructions in order to delete the files.
- After this, go back to Storage Usage and click Other.
Windows 10 will now lost all folder that could not be categorized and you can simply identify which folder are using the most storage space and then click on them so that you can access the location and then select the content and right-click it. After this, select Delete to remove the files and folder.
Trick 4: Delete the Windows 10 Recovery Partition
You can proceed try this option as well if you are desperate because you will lose the ability to use any of Windows 10’s recovery options and then you will not be able to boot into the recovery environment to troubleshoot other aspects of the operating system.
- It is always recommended to make complete backups of your data and create a USB recovery drive before continuing.
- In the first option, open Command Prompt as an administrator and then type Diskpart and then press Enter key. Type List disk and then press Enter again.
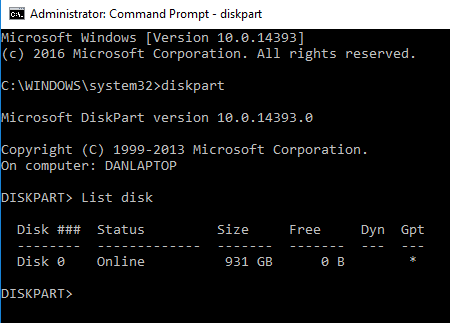
- Now type Select disk X, it will replace the X with the number of the disk where your recovery partition is saved and then type List volume.
- You will be shown a list of all the volumes on the disk including the recovery partition. Then type Select volume X.

- Last but not the least, type Delete volume and hit Enter.
Trick 5: Delete File History Versions to Free up System Disk
In order to delete file history versions to free up system disk, you can follow the steps below:
- Press Windows + X so that a Power User menu can be opened and then select Control Panel.
- Now click File History -> Click Advanced Settings on the left panel of the control panel.
- After this, change the default options under Versions by clicking the drop down menu on the right for Save copies of files and Keep saved versions to the best options that can suit your needs like Every 12 hours and 3 months, etc.
- Click Clean up versions and then select the file versions you wish to delete from the drop down menu. If you want to get the most space by only keeping one version of files and then click All but the latest one option.
- Now click the Clean up button to complete the process and then click Save changes button on Advanced Settings in order to commit the new changes.
After deleting or removing useless files from PC you will more available useful space for loading Windows 10 Anniversary Update or get a faster-running speed in your newly Windows 10 anniversary updated PC.
Conclusion:
After going through these above tricks, you may have noticed that how you can clean up System Disk For Windows 10 Anniversary Update. These tricks can help you clean up System Disk easily and you can then easily Windows 10 Anniversary Update.