
Every Windows operating system user must have come across the common Windows issues such as freezing, hanging and unexpected system shutdown. Well, this is very irritating and to fix it there are many diagnostic utilities included in Windows computer.
So today in this article, I’ll describe the complete information about the Scandisk command in the Windows operating system and how to run it to fix common Windows issues. The Windows system has created quite an impressive interface with built-in commands for the users. And the Scandisk command in one of them, this is the best utility to get rid of the various Windows issues and maintain PC problem.
What is the Scandisk Command in Windows?
Microsoft ScanDisk is a diagnostic utility application included in MS-DOS. This can be used for checking and fixing hard disks and floppy disks errors. Well, this command is an advanced successor to CHKDSK (Check Disk) command.
The Scandisk utility scan disk surfaces issues and marks those sections to prevent rewriting of data and data loss. This also manages to repair the cross-linked files that are not possible with CHKDSK command.
So, this all about scandisk command and now follow the steps to run Scandisk command in Windows to fix the hard disk or floppy disk errors and make your system error-free.
You May Also Read:
- Improve Your PC Speed With Disk Defragmentation and Cleanup!
- How to Optimize Windows 8 and 8.1 to Run Faster
- 5 Must Use Tricks to Clean Up System Disk For Windows 10 Anniversary Update
How to Run Scandisk Command in Windows OS
Here check out the complete steps to run the scandisk command in different Windows versions.
# For Microsoft Windows XP, 2000, Vista, and 7 Users:
Follow the given steps to run the scandisk command:
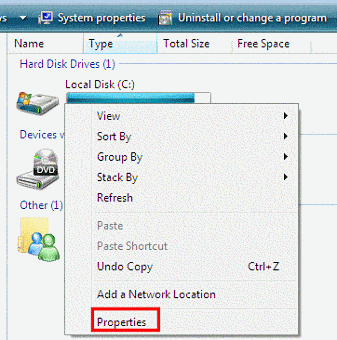
- Open My Computer > then highlight local hard drive by clicking once on it.
- And right click on the highlighted local hard drive
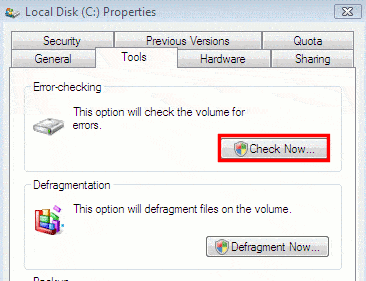
- Click Properties > Tools tab > click check now to scan the drive for errors.
- And restart your computer to run Scandisk without any interruption.
# Run Scandisk Windows 8 System:
The Windows 8 users can follow the given steps to run scandisk command.
- Click the Start button > Computer.
- And right-click the hard drive you need to scan > click Properties.
- Select the Tools tab > then under Error-checking > click Check Now.
- Now choose Scan for and attempt recovery of bad sectors and Automatically fix file system errors.
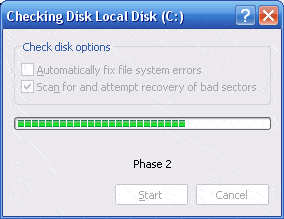
- And to schedule, after restart > choose Yes
- To run the scan > restart your computer.
In this way, you can perform the scandisk command in Windows 8 operating system
# Run Scandisk Windows 10:
If using Windows 8 computer then follow the given steps to run the scandisk command:
- Click Start > type This PC > hit Enter.
- Now right-click the hard drive needed to scan and choose Properties.
- Choose the Tools
- Click Check.
And in this way to the scandisk command is performed in Windows 10 computer.
Advantages of using the Scandisk Command:
Check the benefit of using the Scandisk command:
- This helps the users to fix the cross-linked and lost files
- You can also identify the long filenames
- Scan disk partitions marked as dirty by the improper shutdown or operating system
- This can perform a full scan of hard drives and floppy disks to check for damage.
- It can also be run from the command line that allows you to boot from the floppy disk that boosts its functionality.
- It also comes with Graphical User Interface that provides more intuitive, interface and easy control.
Conclusion:
So this is all about how to run Scandisk command in the different Windows version.
Follow the given steps one by one and run the Scandisk command in your Windows system.
Apart from that, you can also make use of the Windows Repair Tool, this is the advanced tool to scan, detect and repair various Windows errors. With the help of this, you can fix corruption, damages of the Windows system files, malware/viruses, protect you from file loss, hardware issues and many more.
Apart from that always keep your Windows operating system and device drivers updated. And scan your system completely with the good antivirus program at the regular interval of time to maintain the PC performance.
Additionally, if you find the article helpful or have any query, comment, questions or suggestions related, then please feel free to share it with us in the comment section below or you can also go to our Fix Windows Errors Ask Question Page.
Good Luck!!!

