
Are you the one got frustrated with the slow, hanging PC/laptop, like the old Windows OS? Except you are using the brand new Windows 10 device then here know what’s going on your Windows 10 OS.
Well, this problem has become common among the Windows 10 users. Many are found struggling with the disk usage 100 Windows 10 issue and looking for the fixes.
Sometimes, using few programs might cause the hard drive to over-work. Generally, the issues occur when the computer’s hard drive is constantly working at or near 100%, and won’t have any space to perform other tasks, even the routine performing tasks, then this gradually slow down the Windows 10 OS almost to a halt.
However, this is an irritating problem but is relatively common as this can be fixed easily.
In this article, check out the fixes, that you can try to fix 100% disk usage windows 10. But first, check whether the 100% disk usage is actually your problem or not.
If the 100% disk usage is not causing the Windows 10 perform slow or hang, then avoid following the steps given and in that place to solve to boost the performance of your Windows 10 OS scan your device with Windows Repair Tool.
So, here know how to do so…
Steps to check if anything is causing your Windows 10 hard disk to Over-work
Please Note: The given steps might take some time if your hard drive is being over-worked.
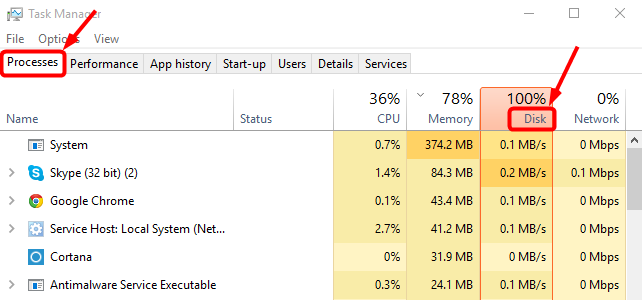
- First type “task manager” in the Windows search bar > choose Task Manager:

- Then, in the Processes tab, look at the percentage (%) at the top of the Disk If it is 100% (or close to it and it has a red background), and something is causing your hard disk to over-work.
So, here know how to resolve Windows 10 100% disk usage problem.
Here we go…
How to Fix Windows 10 100 Disk Usage Problem:
To fix the 100% disk usage Windows 10 issue you need to perform certain working solutions that worked for others. But before following the solution try the easy tweaks like restarting your system, updating the device drivers (try Driver Booster to update drivers automatically), now check if the 100 disk usage Windows 10 issue is resolved or not. if not then go with the below solutions.
Solution 1: Disable Windows Search
Check if Windows search is causing 100% disk usage problem, then first temporarily disable Windows Search and verify if this speed up your device. If it works for you, then permanently disable Windows Search.
1. Temporarily Disable Windows Search
Windows Search makes files searching on your PC much faster. If you don’t use it all, then disable it completely.
Disabling this service stop indexing all files, and this will take a longer time.
Here know how to temporarily disable Windows Search and fix if it is the cause of your 100% disk utilization problem.
Note: Windows Search will start again when you restart your device.
Follow the steps to do so:
- Press the Windows logo key + X > select Command Prompt (Admin).

- And, click Yes at the User Account Control window prompt.

- The command prompt window appears, here type in the following command:
- net.exe stop “Windows search”
- Press Enter on your keyboard.

Now, check if your disk usage and the performance of your computer improve. If this helps, permanently disable Windows Search. Follow the steps to do so:
2. Permanently Disable Windows Search
- Press Windows logo key + R > type in services.msc.
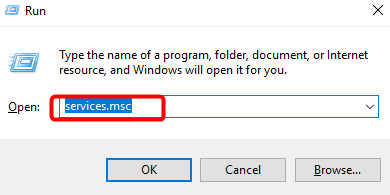
- Now, locate Windows Search option > double click it to enter its Properties window.

- Next, change the Startup type to Disabled and then click Apply > OK to save your change.

Also Read: 5 Must Use Tricks to Clean Up System Disk For Windows 10 Anniversary Update
Solution 2: Disable SuperFetch
SuperFetch helps in decreasing the boot time and makes the must-load programs more efficient.
Well, this is also recognized as a possible cause of disk performance issues in Windows 8 and earlier, Windows 10 as well.
Here follow the step to stop the service:
- Press Windows key and X > choose Command Prompt (Admin).
- Then, click Yes at the User Account Control prompt.
- The command prompt display and type the given command:
- net.exe stop superfetch
- And hit Enter.

And wait for some time and see if your PC starts performing better and the Windows 10 100 disk usage issue is resolved or not.
Solution 3: Disable Anti-Virus Software Temporarily
In many cases, it is found that the third party antivirus or anti-malware programs cause the Windows device to perform sluggishly.
So, you need to temporarily disable your installed antivirus software. This worked for many users. If after doing this your device disk usage returns to normal then you can contact the vendor of the software to check if they can provide any help.
Well, Windows 10 OS is also having its own anti-malware tool – Windows Defender and is by default enabled. So, if you disable your antivirus application then Windows defender is always there for you.
Also Read: FIX: Windows Defender Fails To Track Ransomware in Windows 10
Solution 4 – Perform a Disk Check
If the above-given solutions won’t work for you then, try this to fix 100% disk usage windows 10 issue:
Follow the given instruction:
- Press Windows key and X > select Command Prompt (Admin).
- And click Yes at the User Account Control
- The command prompt appears, then type the given command:
- chkdsk.exe /f /r
- Press Enter and type Y to confirm you like to perform the disk check the next time you reboot your device. Make sure to close all your applications first.

Please Note – The next time when you restart your PC the disk check will start automatically and this might take some time to complete (maybe a day). So, if you don’t have time to wait then simply skip it. But you need to reschedule it again, as described above, though.
Also Read: Improve Your PC Speed With Disk Defragmentation and Cleanup!
Solution 5: Reset Virtual Memory
Virtual memory is considered as an extension of your PC physical memory. It is a combination of RAM and a hard drive portion.
And when RAM is not enough to perform a certain task, Windows will temporarily store files in virtual memory, and swap them back to RAM when required.
Additionally, resetting the virtual memory worked for many users to fix Windows 10 100 disk usage issue.
Here know how to reset virtual memory:
- Press Windows + Pause/ Break keys > choose Advanced System Settings on the left panel.

- Now, go to the Advanced tab > click Settings.
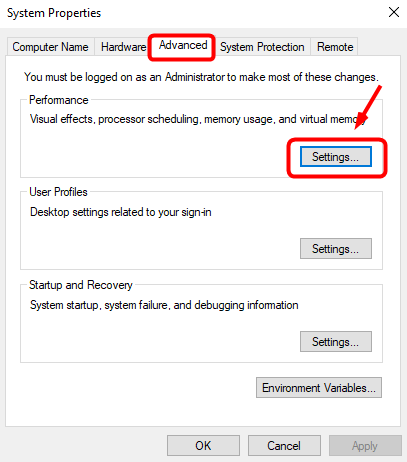
- Then, go to the Advanced tab again > choose Change… in the Virtual memory section.

- Next, make sure the Automatically manage paging file size for all drives check box is NOT

- Select Windows drive (the hard drive or partition where Windows is installed on it – usually C: ), and type the Initial size and Maximum size for your virtual memory:
- Initial size – This value varies, as it depends on your computer. So if you are not sure what value to use, then just enter whatever number is in the Recommended
- Maximum size – Avoid setting this value too high. This should be about 1.5 times the size of physical RAM.
- Once you’ve entered your virtual memory values, click Set then click OK to continue.

- Now, clear your computers ‘temp’ And press Windows key + R than in the Run form, type temp > press Enter. This will bring Windows Explorer with the Temp folder open and display the entire temp files on your PC/laptop.

- Select entire files in the Temp folder > delete them.

Hope after following the given fixes you are able to fix Windows 10 100% disk usage.
However, it is also recommended to scan your system with the Windows Repair Tool, to solve other issues in Windows operating system and optimize its performance.
Check Your Windows PC/Laptop Health
Scan your PC/laptop with the professional recommended Windows Repair Tool to fix various issues related to Windows 10 OS. This tool is designed with the advanced algorithm and is able to repair most computer errors, and also protect you from file loss, malware, hardware failure and optimize your PC for maximum performance. Quickly fix PC problems like BSOD, DLL error, Registry issues, drivers issues, application error, and many others and prevents others issues automatically with this software.
Now It’s Your Turn:
Hope the given solutions help you to fix the Windows 10 100 disk usage issue. Make sure to follow the given manual steps and commands correctly to avoid other damages.
However, if you are not technically savvy then feel free utilize the tested automatic solution to fix 100 disk usage Windows 10 and make your Windows system error-free free and optimize its performance.
Apart from that, always keep your drivers, Windows system updated to avoid issues and keep your PC healthy, also delete the temporary files, uninstall the unwanted programs and applications and scan your system with the antivirus program at the regular interval of times.
Additionally, if you find the article helpful or have any query, comment, questions or suggestions related to it, then please feel free to share it with us in the comment section below or you can also go to our Fix Windows Errors Ask Question Page.
That’s it!!!

