Mouse lag is a very irritating problem faced by the Windows 10 users. This major issue is not only frustrating but also affect the user experience.
As per user, this appears after switching to Windows 10 and continues while using Windows 10. This issue interrupts playing games on Windows 10 and also affects the user experience and PC performance.
Here in this article, learn the different solutions to resolve Mouse Lagging Windows 10.
But before moving further remember the Windows 10 mouse lag can appear on the different machine like laptops and desktops. And the common symptoms of the issue are the following:
- Mouse cursor is stuttering;
- The mouse cursor freezes;
- The cursor is not moving at all.
Moreover, the Windows 10 mouse lag issue is not caused due to any particular reason. This issue is related to various different reasons like misconfigured Windows settings, malware infection, hardware issue and many others. So here some of the possible fixes to resolve the mouse stuttering in Windows 10 or Windows 10 mouse lag.
How to Fix Mouse Lag Windows 10 Issue
Solution 1 – Enable/Disable Scroll Inactive Windows
- Very firstly go to Settings > Devices > Mouse & Touchpad. And search the Scroll Inactive Windows option and enable/disable it.
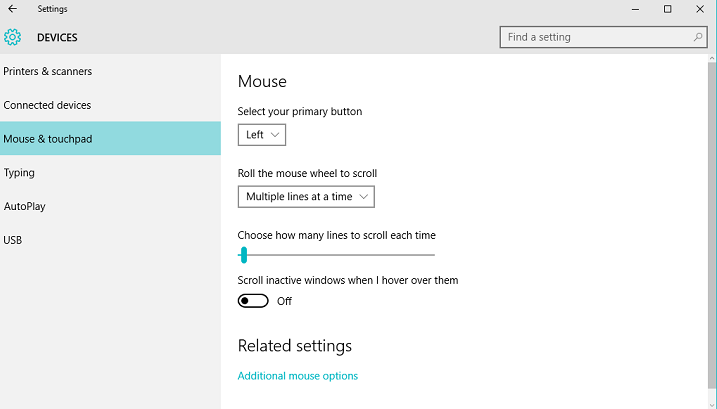
- Now attempt to disable and enable the option for few times and ensure the issue is solved or not.
Solution 2 – Change the Palm Check Threshold
- Navigate to Mouse & Touchpad settings as given in step 1.
- Now click Additional Mouse Options.
- And select the TouchPad Tab.
- Click on Settings and go to Advanced tab.
- Find the Palm Check Threshold and move it all the way to the left.
Solution 3 – Set the Touchpad to No Delay
For making use of it go to Mouse and Touchpad settings as given in the above steps. Next, you need to find out the Touchpad section and set the delay before clicking to No Delay (always on).

Solution 4 – Turn off Cortana
This is somewhat an unusual solution, but as per some users turning off Cortana resolver the mouse lag issue in Windows 10. So to turn off Cortana make use of the following steps:
- Start Cortana and go to Settings situated in the top left of the corner.
- And in the Settings locate the Cortana just set it off.
Solution 5 – Disable NVIDIA High Definition Audio
It is found that NVIDIA High Definition Audio and other audio drivers are also responsible for causing the problem in some cases. So if you are using NVIDIA card then try out the following steps:
- Uninstall the GeForce experience app.
- Next, go to Device Manager and find NVIDIA High Definition Audio.
- Click Right on it and select Disable.
Same steps will work for other audio drivers like Realtek
Important: if disabling audio drivers don’t work then simply uninstall them.
Apart from that run Driver Booster to update the outdated drivers and fix driver related issues automatically.
Further Reading:
- 5 Quick Tweaks to Speed up Slow Shutdown in Windows 10
- How to Fix Windows 10 Taskbar Not Hiding in Full-Screen Issue
Solution 6: Re-install and Update your Mouse Driver
If none of the above-given solutions works for you then first try to uninstall and then reinstall the mouse driver.
Follow the steps to uninstall mouse driver
- Open Device Manager;
- Choose Mice and other pointing devices;
- Now right-click on your mouse and then Uninstall Device;
Follow the steps to update the mouse driver
- On the Device Manager > click Mice and other pointing devices;
- Locate your mouse and right-click on it;
- And choose Update Driver
Solution 7: Disconnect Other USB Devices
In some cases the USB devices interfere with the mouse and cause the mouse lagging Windows 10, commonly if you are using the USB hub to connect multiple USB devices.
So, disconnect the portable hard drive from USB port and other USB devices as well and check if the issue is resolved.
Solution 8 – Use USB Extender
This solution is for the wireless mouse users. It is found that due to the interference the wireless mouse users are facing the issue. However the other devices can cause interference, so it is suggested to make use of the USB extender to fix the mouse lag issues in Windows 10.
Simply connect the receiver to the extender and move it away from the Pc and other devices that might cause interference. Hope doing this, fix the mouse lag issue.
Automatic Solution: Windows Repair Tool
You can take help of the automatic tool by simply downloading and installing the Windows Repair tool on your PC. With this, you don’t need to apply manual methods. This is designed especially to identify and fix the corruptions, errors of the Windows OS automatically. It also fixes all type of internal issue and makes the PC run smoothly. It is the most trustable tool to fix any kind of Windows error, DLL error, Registry error, Application error and many more. This is the advanced tool that scan, detect and repair various Windows operating system issues such as corruption, damages of the malware/viruses, protect you from file loss, hardware issues and many more
Conclusion:
Hope that the given fixes help you to fix mouse lag Windows 10.
Try the given manual fixes one by one and get rid of the mouse lagging issue in Windows 10. Make sure to follow the manual commands and other steps carefully.
Also, delete the temporary files, scan your system with good antivirus software and remove unwanted software from time to time to maintain the Windows PC performance and other issues.
Additionally, if you find the article helpful or have any query, comment, questions or suggestions related, then please feel free to share it with us in the comment section below or you can also go to our Fix Windows Errors Ask Question Page.
Good Luck!!!