
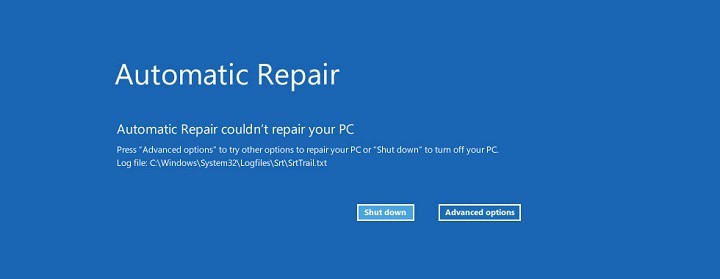
An automatic repair is a tool integrated into Windows 10 to fix various PC issues. But sometimes the Windows 10 Automatic Repair can’t fix the problems and get stuck in the startup repair loop in Windows 10.
Well, this is a most frightening moment as you start getting the “Windows 10 Automatic Repair couldn’t repair your PC” or the “Windows 10 Automatic Repair Failed” message on your screen. And many users are found posting in forum threads how to fix Windows Automatic Repair loop issue.
Let describe it best with the user experience:
Hello,
I am stuck in the “automatic repair loop”. I have tried numerous fixes. I was able to restart in “safe mode with networking”. But now the computer will not recognize my log in password. So I am locked out now too.
Any help would be appreciated.
TIA.
Original Post From Microsoft Community
Here, in this article check out the possible workarounds to fix Windows 10 Automatic Repair Failed Loop.
Fix “Windows 10 Automatic Repair Failed” Loop
Well, before following the given workarounds here try some easy steps to fix the automatic repair failed message in Windows 10 such as remove the additional hard drive or external USB devices, remove RAM, disable anti-malware security program and delete the problematic file.
After trying the given solution you can check automatic repair Windows 10 loop issue is fixed or not. If in case NOT, then move towards the given solutions below.
Here We GO…
Solution 1 – Utilize Command Prompt from Windows 10 Boot Options menu
After restarting your PC several times, you can make use of the Windows 10 Boot Options menu to fix automatic repair failed.
As the Boot Options menu appears, follow the given steps:
- Select Troubleshoot > Advanced Options>Command Prompt from the list of options.
- As the Command Prompt appears, enter the given commands and hit Enter after typing each command:
- bootrec.exe /rebuildbcd
- bootrec.exe /fixmbr
- bootrec.exe /fixboot
- Well, it is also suggested to run the additional chkdsk commands also. And for performing these commands, you need to know the drive letters of your entire hard drive partitions. In the Command Prompt enter the following (remember using the letters that match your hard drive partitions on your PC):
For example –
- chkdsk /r c:
- chkdsk /r d:
Note: It is recommended to perform the chkdsk command for every hard drive partition that you are having.
- Now restart your PC/laptop and check if the Windows 10 automatic repair couldn’t repair your PC, the message is solved or not.
But if still, you are having Windows 10 automatic repair failed issue, then follow the second solution to troubleshoot automatic repair failed issue.
Also Read: How to Fix the Automatic Repair Loop in Windows 8.1
Solution 2 – Boot into Safe Mode & Run Command Prompt
Many users who have fixed the “Windows 10 Automatic Repair Failed” message have confirmed they are facing the issue due to a bad driver, like Windows driver for a wireless Logitech mouse.
Also Read: How to Fix: Mouse Lags Appears in Windows 10
So, if you are having a similar problem and using the same hardware then try the solution to fix it:
- After restarting your system for few times, boot to Boot Options menu. Select Troubleshoot > Advanced options > Startup Settings.
- And then click Restart button your system now restart and provide the list of options. Select Enable Safe Mode with Networking.
- As the Safe Mode starts, download the updated version of the driver that is causing the issues. You can also download the driver from the manufacturer website and save it to your USB flash drive.
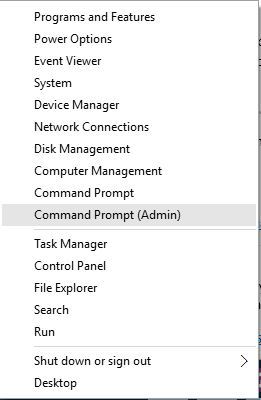
- Then, hit Windows Key + X > select Command Prompt (Admin) from the list.
- As the Command Prompt starts, type or paste the given command and hit Enter to run it:
- DISM /Online /Cleanup-Image /RestoreHealth

- The entire process may take 15 minutes or more for the process to complete. So wait for the entire process to complete.
- As the process is finished > restart your PC.
- As Windows 10 starts, install the latest driver that you have downloaded.
Hope that the given solution will resolve the issue. The solution is a bit tricky as you need to identify which driver is causing the problem. However, if you don’t know then also you can try the solution but skip the step 1.
Additionally, if you want to prevent the issue in future then scan your PC with the Windows Repair Tool, to fix various PC issues like malware, file loss, registry issues, hardware issues, DLL error and many others
Solution 3 – Remove the Problematic file
As we said above that deleting the problematic file fixes the “Windows 10 Automatic Repair Failed” loop. Many users reported that sometimes VMW is the files that cause the issue.
However, you can also check for the issue by opening the log file and check which file is causing Windows 10 automatic repair loop.
Follow the given steps to do so:
- After restarting your PC/laptop for few times, access the Boot Menu.
- And select Troubleshoot > Advanced Options > Command Prompt.
- As the Command Prompt opens, enter the given command:
- C:
- cd Windows\System32\LogFiles\Srt
- SrtTrail.txt
When the file opens, you can see something like this, For example – Boot critical file c:\windows\system32\drivers\vsock.sys is corrupt.
Now you need to do some research, like what this problematic file does. If the files are related to a third party application and not OS files required by Windows you can delete it.
Then to delete a file, move to the specified location using the Command Prompt and enter a del command.
For example:
- cd c:\windows\system32\drivers
- del vsock.sys
Well, you might have to navigate to the different folder and delete a different file. But before deleting a file, make sure the file you are deleting is not a core Windows 10 file; otherwise, you can damage your operating system.
After removing the problematic file, restart your PC and uninstall the program that caused the issue.
Helpful article:
Solution 4 – Disable Automatic Startup Repair
However, is the above-given solution won’t help in your case. Then the simple trick to solve the “Windows 10 Automatic Repair couldn’t repair your PC” loop is just disabled the Automatic Startup Repair Loop.
Follow the steps to do so:
- As the Boot Options start, select Troubleshooting > Advanced Options > Command Prompt.
- Next Command Prompt should start. Enter the given command and hit Enter to run it:
- bcdedit /set {default} recoveryenabled No
Well, doing this will disable the Startup Repair, and now you can access Windows 10 again.
Also Read: Windows 8 C++ Runtime Error on Advanced Startup/Restart
Solution 5 – Restore Windows Registry
The Windows registry corruption is also a cause of getting the “Windows 10 Automatic Repair Failed” loop.
So to fix it, try restoring the registry from RegBack directory.
Please Note: Manipulating registry entries manually is quite risky as a small mistake can take over your entire PC/laptop. So, in this case, you can make use of the automatic Registry Repair Tool, to solve the registry issues automatically and safely.
Here follow the steps to perform this:
- When the Boot Options appear > start Command Prompt.
- And in Command Prompt, enter the given command and hit Enter to run it:
- copy c:\windows\system32\config\RegBack\* c:\windows\system32\config
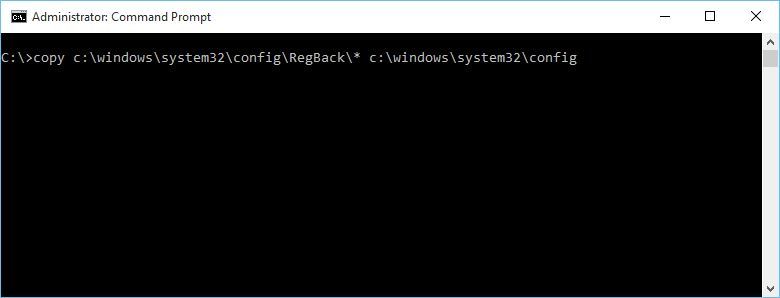
- When you were asked to overwrite files > type All and hit Enter.
- Type exit and hit Enter to exit Command Prompt.
- And restart your system and check if the issue has been resolved.
Solution 6 – Check Device Partition and OSdevice Partition
It is seen that if the device partition values are not correct and this causes the “Windows 10 Automatic Repair Failed” loop.
So try to repair it by following the given steps:
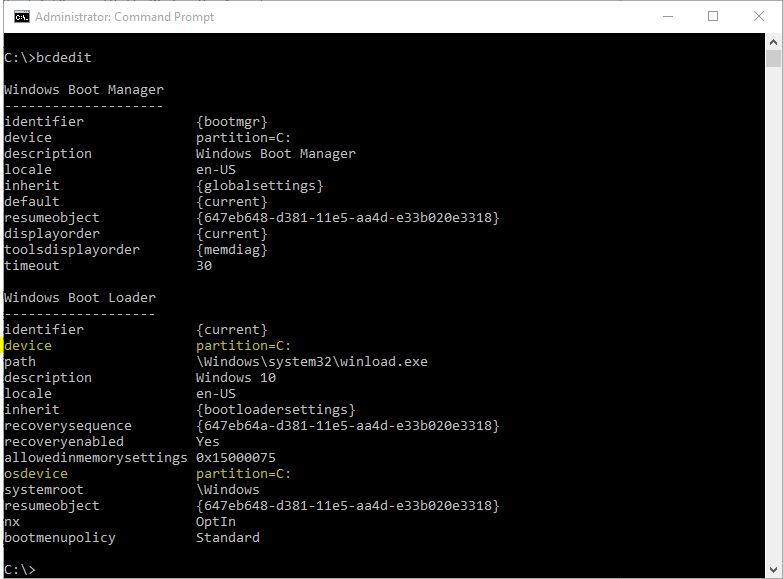
- From Boot Options start Command Prompt and enter the given command and hit Enter
- bcdedit
- Now, find device partition and os device partition values and be sure that they are set to correct partition.
- In our device, the default and correct value are C: but due to some reason it is changed for E: and this is creating automatic repair failed.
And if in your case the value is not set to C: then enter the given commands and hit Enter after each.
- bcdedit /set {default} device partition=c:

- bcdedit /set {default} osdevice partition=c:
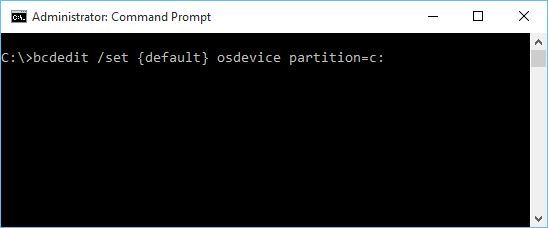
- This should be by default C: but if your Windows 10 is installed on a different partition than you need to use that partition’s letter instead of C.
- And restart your PC and check if the issue is resolved or not.
Solution 7 – Perform Refresh or Reset
If after trying the given steps you are still facing the issues, then the last working solution on our list perform Reset or Refresh.
Doing this will remove the installed application; however, the Universal apps and settings will be saved if you select the Refresh Option.
Whereas the Reset option will delete the entire installed files, apps and settings as well.
So, it is suggested before performing the steps, create a valid backup of your important files and folder.
Now, to perform Refresh or Reset, follow the steps:
- As the Boot Menu opens > select Troubleshooting.
- Select between Refresh or Reset option.
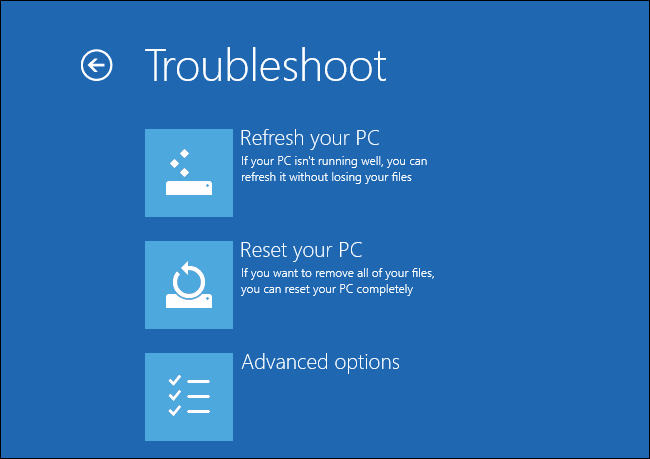
- And follow the onscreen instructions to complete the process.
Well, to complete the process you might need a Windows 10 installation media. So, before starting it assure that you are having it.
Check Your Windows PC/Laptop Health
Scan your PC/laptop with the professional recommended Windows 10 Repair Tool to fix various issues related to Windows 10 OS. This tool is designed with the advanced algorithm and is able to repair most computer errors, and also protect you from file loss, malware, hardware failure and optimize your PC for maximum performance. Quickly fix PC problems like BSOD, DLL error, Registry issues, drivers issues, application error and many others and prevents others issues automatically with this software.


Now It’s Your Turn:
Hope the given solutions will help you to fix the Windows 10 Automatic Repair Loop Failed issue4.
Make use of the given workarounds to fix the issue and start using Windows 10 again easily.
However, if you find the given workarounds complicated then in this case you can make use of the automatic Windows Repair Tool.
Apart from that, always keep your drivers, Windows system updated to avoid common issues and keep your PC healthy.
Additionally, if you find the article helpful or have any query, comment, questions or suggestion related to it, then please feel free to share it with us in the comment section below or you can also go to our Fix Windows Errors Ask Question Page.
That’s it!!!

